Horse Trailer Parts: A UK Owner’s Complete Guide (2026)
You usually notice it just before loading up. A light flickers when you tap the plug. The ramp sounds slightly different underfoot. One wheel arch carries a fine line of road grime that suggests something is weeping or rubbing where it shouldn’t. None of that feels dramatic, but experienced owners know small trailer faults rarely stay small for long.
With horses on board, a neglected trailer part doesn’t just risk a repair bill. It can mean a cancelled trip, a roadside stop on a hard shoulder, or a horse arriving stressed, overheated, or unsettled before it even reaches the yard or showground. That’s why trailer maintenance has to be practical, not cosmetic. You’re checking systems that hold weight, absorb shock, control stopping, and protect a live animal that can’t brace itself the way a pallet of feed can.
A lot of online guidance still leans heavily on the US market. It’s useful up to a point, but it often skips over the British legal and sourcing issues that matter here at home. Even broad market reporting that notes the scale of the industry, including over 400,000 registered horse trailers in the US, still doesn’t answer the day-to-day UK questions about standards, testing, parts compatibility, and local supply chains, as noted by horse trailer market coverage highlighting the gap in UK-specific guidance.
If you’ve ever hauled to lessons, clinics, hunting, sales, or local events, you already know the trailer is part of the day’s outcome. It affects welfare, timing, confidence, and whether the journey feels routine or tense. The same attention people give to turnout, tack fit, and transport planning should apply to the metal, timber, wiring, rubber, and fixings beneath the horse.
That same practical mindset shows up across equestrian presentation and transport-related branding too, including projects such as Coach Horses work, where clear attention to detail matters because horse owners notice when something feels solid and cared for.
The Real Cost of a Neglected Horse Trailer
A neglected trailer rarely announces itself with one obvious failure. More often, it chips away at safety in stages. A worn bush lets a suspension component move more than it should. That movement puts extra strain on tyres. The tyre runs hotter. Braking feels less settled. The horse shifts its balance more often in transit. You end up treating the symptom, not the cause.
The cost isn’t just money. It’s confidence. Once an owner has had a bad towing experience, they start second-guessing every noise and every lane change. Horses pick up that tension. A trailer that rattles, jolts, or brakes unevenly creates a travelling environment that can make even a seasoned horse anxious.
Small faults create bigger failures
Owners often delay action because the trailer still seems usable. The ramp still closes. The lights mostly work. The tyres still hold air. But horse trailer parts live in a harsh environment. Water, muck, road salt, vibration, standing loads, and infrequent use are a bad combination. Parts deteriorate while the trailer is parked just as surely as they wear while it’s moving.
Practical rule: If a fault affects braking, steering feel, load stability, flooring, hitching, or ventilation, treat it as a transport problem, not a maintenance chore.
That’s especially important in the UK, where a trailer has to cope with wet winters, rougher surfaces on rural routes, steep farm access, and long periods standing between journeys. The horse only experiences the result. It doesn’t care whether the issue came from old tyres, corroded connectors, or a cracked floor edge.
What neglect usually looks like in real life
A capable owner can spot most warning signs early if they know where to look:
- Electrical clues: Tail lights that cut in and out, dim indicators, or brake lights that work only after wiggling the plug.
- Running gear clues: Uneven tyre wear, one hub running hotter than the others after a journey, or a trailer that feels unsettled under braking.
- Structural clues: Soft spots in the floor, rust blooming around fixings, a ramp that no longer sits square, or partitions that don’t latch cleanly.
- Horse behaviour clues: Reluctance to load, scrambling, leaning heavily, or arriving sweatier and more agitated than usual in mild conditions.
Those signs don’t always mean a major rebuild is coming. They do mean the trailer deserves a proper inspection before the next trip.
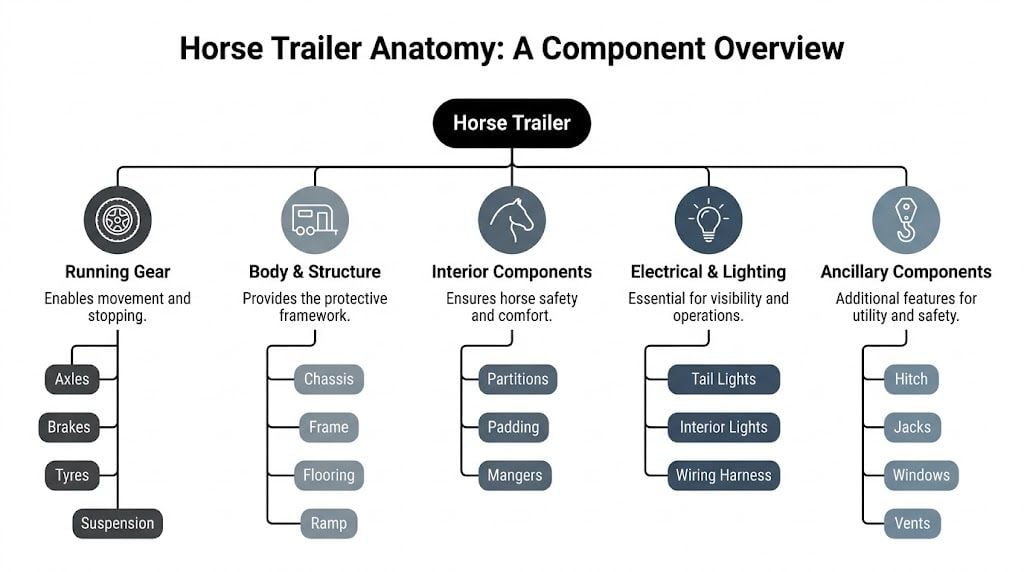
The Anatomy of Your Horse Trailer A Component Overview
It helps to think of a trailer as a working body. The chassis and frame are the skeleton. The axles, suspension, brakes, wheels, and tyres are the joints and muscles. The wiring and lighting act like a nervous system, carrying signals that let the rest of the trailer do its job. Then you’ve got the outer shell and interior fittings that protect the horse and control how it moves inside the trailer.
If you don’t view those systems as connected, it’s easy to make poor decisions. Owners replace visible parts first because they’re easier to notice. New padding, fresh mats, or shiny wheels can make an old trailer look sorted while the floor supports, brake assemblies, or loom underneath are still tired.
The skeleton and skin
The body starts with the drawbar, chassis rails, cross-members, frame, side panels, roof, and ramp assembly. These parts carry the load and keep the trailer square. If the skeleton is compromised, everything mounted to it suffers. Doors stop aligning, ramps twist, floors flex, and partitions stop sitting true.
Flooring deserves special attention because it bridges structure and welfare. A floor isn’t just a panel beneath the horse. It spreads load into the frame, supports mats, affects underfoot confidence, and influences how moisture gets trapped or shed. Whether the floor is timber, aluminium, or a layered system, what matters most is condition, fixing integrity, and support beneath it.
The moving systems
Running gear sits lower down but carries the highest risk if ignored. This group includes:
- Axles and hubs: They carry the trailer’s weight and keep the wheels correctly positioned.
- Suspension units: They absorb road shock and help keep the trailer composed over rough ground.
- Brake assemblies: They slow the trailer in line with the towing vehicle.
- Wheels and tyres: They transfer all of that load to the road.
A fault in any one of those parts changes how the whole trailer behaves. A failing tyre can overload suspension. Worn suspension can affect braking. Brake drag can overheat hubs.
A trailer doesn’t have isolated problems for long. One weak component usually loads another.
The control and comfort systems
The final group covers the fittings owners use every trip. That includes the hitch, jockey wheel, coupling head, breakaway cable, lights, wiring harness, interior lights, vents, windows, partitions, breast bars, breeching bars, padding, and tie points.
Some of these seem simple, but they still matter. A poor vent seal can increase damp and corrosion. A stiff partition pin can slow an emergency unload. A damaged wiring harness can knock out road lights and brake functions together because the systems are interconnected.
When you inspect horse trailer parts, don’t separate “mechanical” from “horse-facing” items too sharply. The horse feels the effects of all of them. A trailer that tows smoothly, stays dry, ventilates properly, and gives the horse secure footing is the product of several systems working together, not one expensive upgrade.
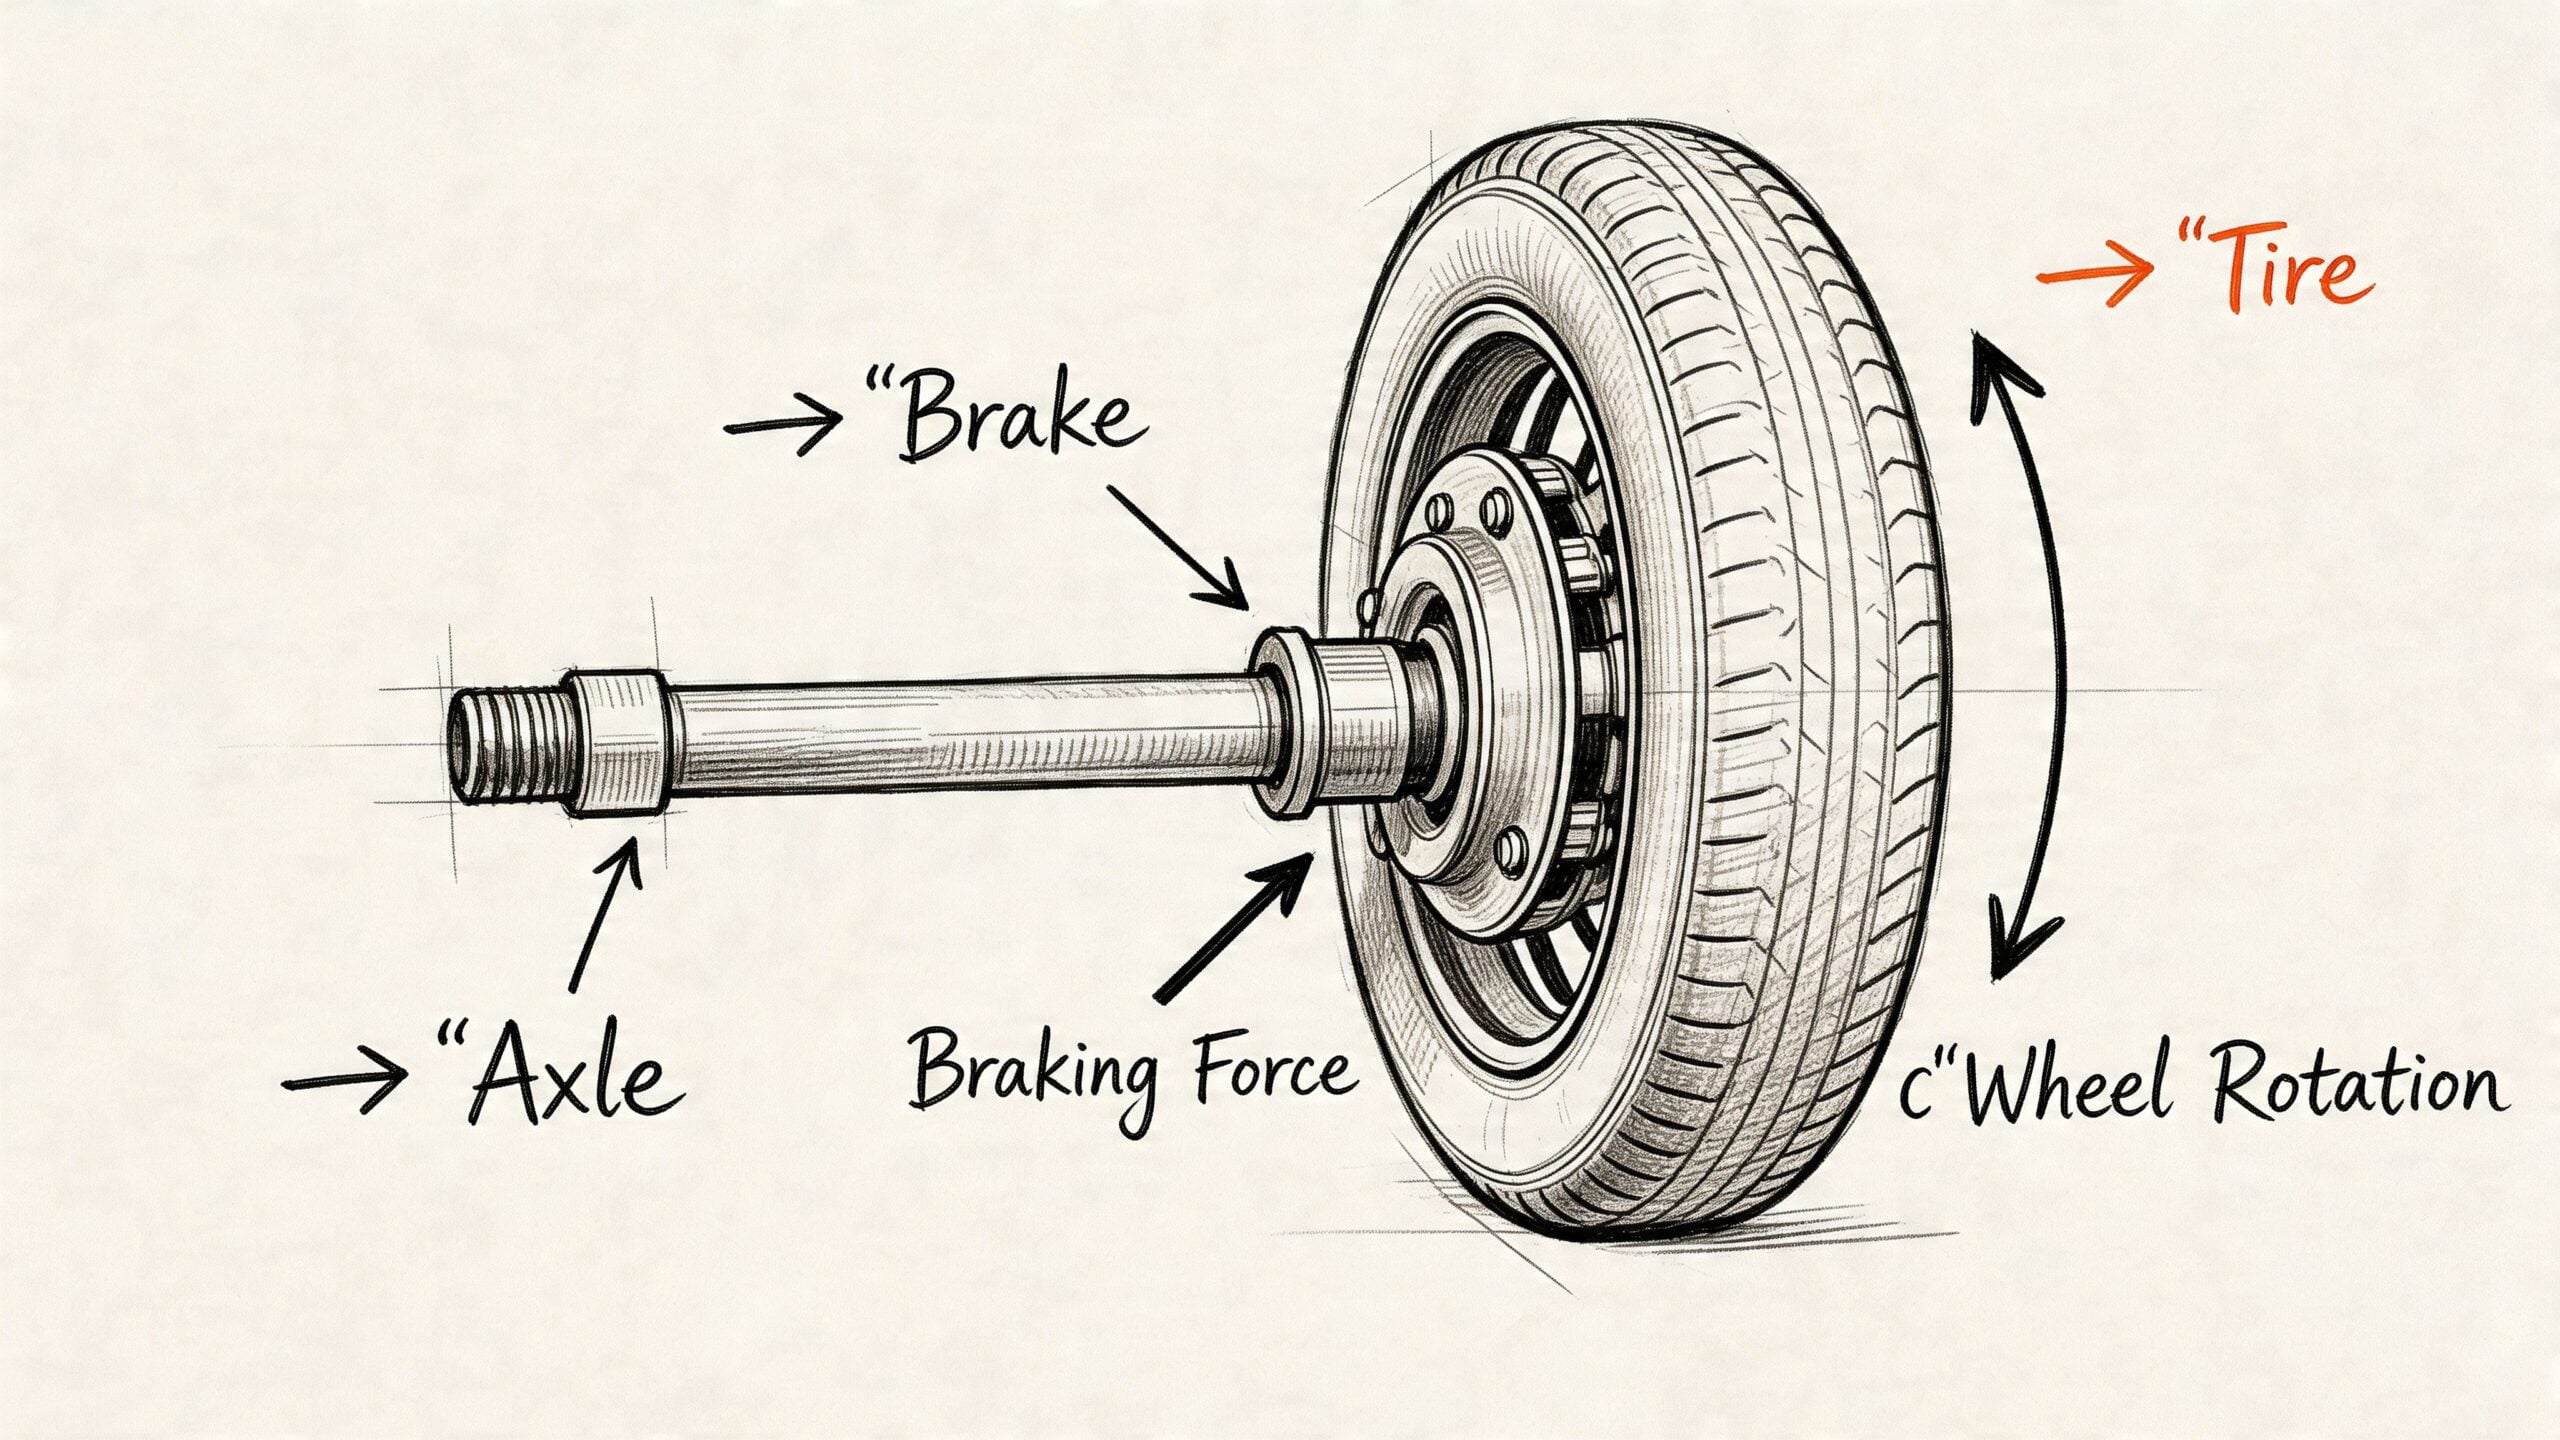
Understanding Your Trailer's Running Gear Axles Brakes and Tyres
Running gear is where safety becomes mechanical fact. If the chassis is the skeleton, this is the part that keeps the trailer rolling straight, carrying weight properly, and stopping when you ask it to. It’s also where poor assumptions cause the most trouble. Plenty of trailers look tidy from the outside while the serious wear sits underneath.
Under UK law, braked trailers over 750kg require a minimum braking efficiency of 45 to 50%, and for a standard 3,500kg GVWR trailer that means tandem axles with integrated electric brakes. The same source notes that mismatched or underrated axles are implicated in 22% of UK trailer-related incidents, which is why axle rating is never an area for guesswork in horse transport according to this trailer specification and compliance reference.
Axles and suspension
Owners usually think of axles as fixed beams, but in practice the axle choice shapes how the trailer behaves over poor surfaces and through bends. A healthy axle setup keeps the trailer level, controls wheel position, and carries weight without excessive heat or movement. A tired or wrongly rated setup does the opposite.
In day-to-day workshop terms, the warning signs are usually clear:
- Uneven stance: One side of the trailer sits lower, especially when loaded.
- Tyre wear pattern: Inner or outer shoulder wear points to alignment or suspension issues.
- Heat after towing: A hot hub or brake drum suggests drag, bearing trouble, or overload.
- Instability under load: The trailer feels busy or unsettled on A-roads instead of planted.
Suspension type matters too. Simpler arrangements can be serviceable if they’re in good order, but many modern setups ask more of the installer and the person diagnosing faults. That’s one reason a visual check on your driveway isn’t enough if the trailer has started behaving differently.
Brakes need testing, not guessing
Brakes on a horse trailer aren’t something to judge by feel alone. Owners often say, “It seems to stop fine,” when what they really mean is the towing vehicle is masking trailer inefficiency until a harder stop exposes it. The legal standard matters, but so does smoothness. Horses cope far better with progressive, balanced braking than with snatchy or delayed trailer response.
Check for these practical signs:
- Pulling or snatching under braking: The trailer feels as if it’s pushing then grabbing.
- Noise from one side: Grinding, squealing, or a rhythmic scrape needs investigation.
- Heat imbalance: One wheel area noticeably hotter than the others after a short run.
- Parking after rain: Brakes binding after standing can point to corrosion or adjustment issues.
Later in the inspection process, this kind of visual guide can help owners understand what they’re looking at before speaking to a technician.
Tyres are load parts, not just rubber
Tyres on horse trailers often age out before they wear out. Tread depth can look fine while the casing has hardened, cracked, or lost confidence under load. Add standing periods, weather exposure, and occasional heavy use, and you’ve got exactly the conditions that catch owners out.
When you inspect tyres, focus on:
- Sidewall condition: Look for cracks, cuts, bulges, and weathering.
- Tread wear shape: Feathering or one-sided wear often indicates another issue, not just tyre age.
- Valve condition: Perished valves can leak slowly and mimic a tyre problem.
- Matching specification: The tyre has to suit the actual trailer and its working load, not just fit the rim.
If one tyre looks worse than the rest, don’t stop at replacing that tyre. Ask what made that corner work harder.
A calm, stable towing feel usually starts here. Good axles, properly functioning brakes, healthy bearings, and correctly specified tyres don’t make a trailer exciting. They make it uneventful, and that’s exactly what you want with a horse on board.
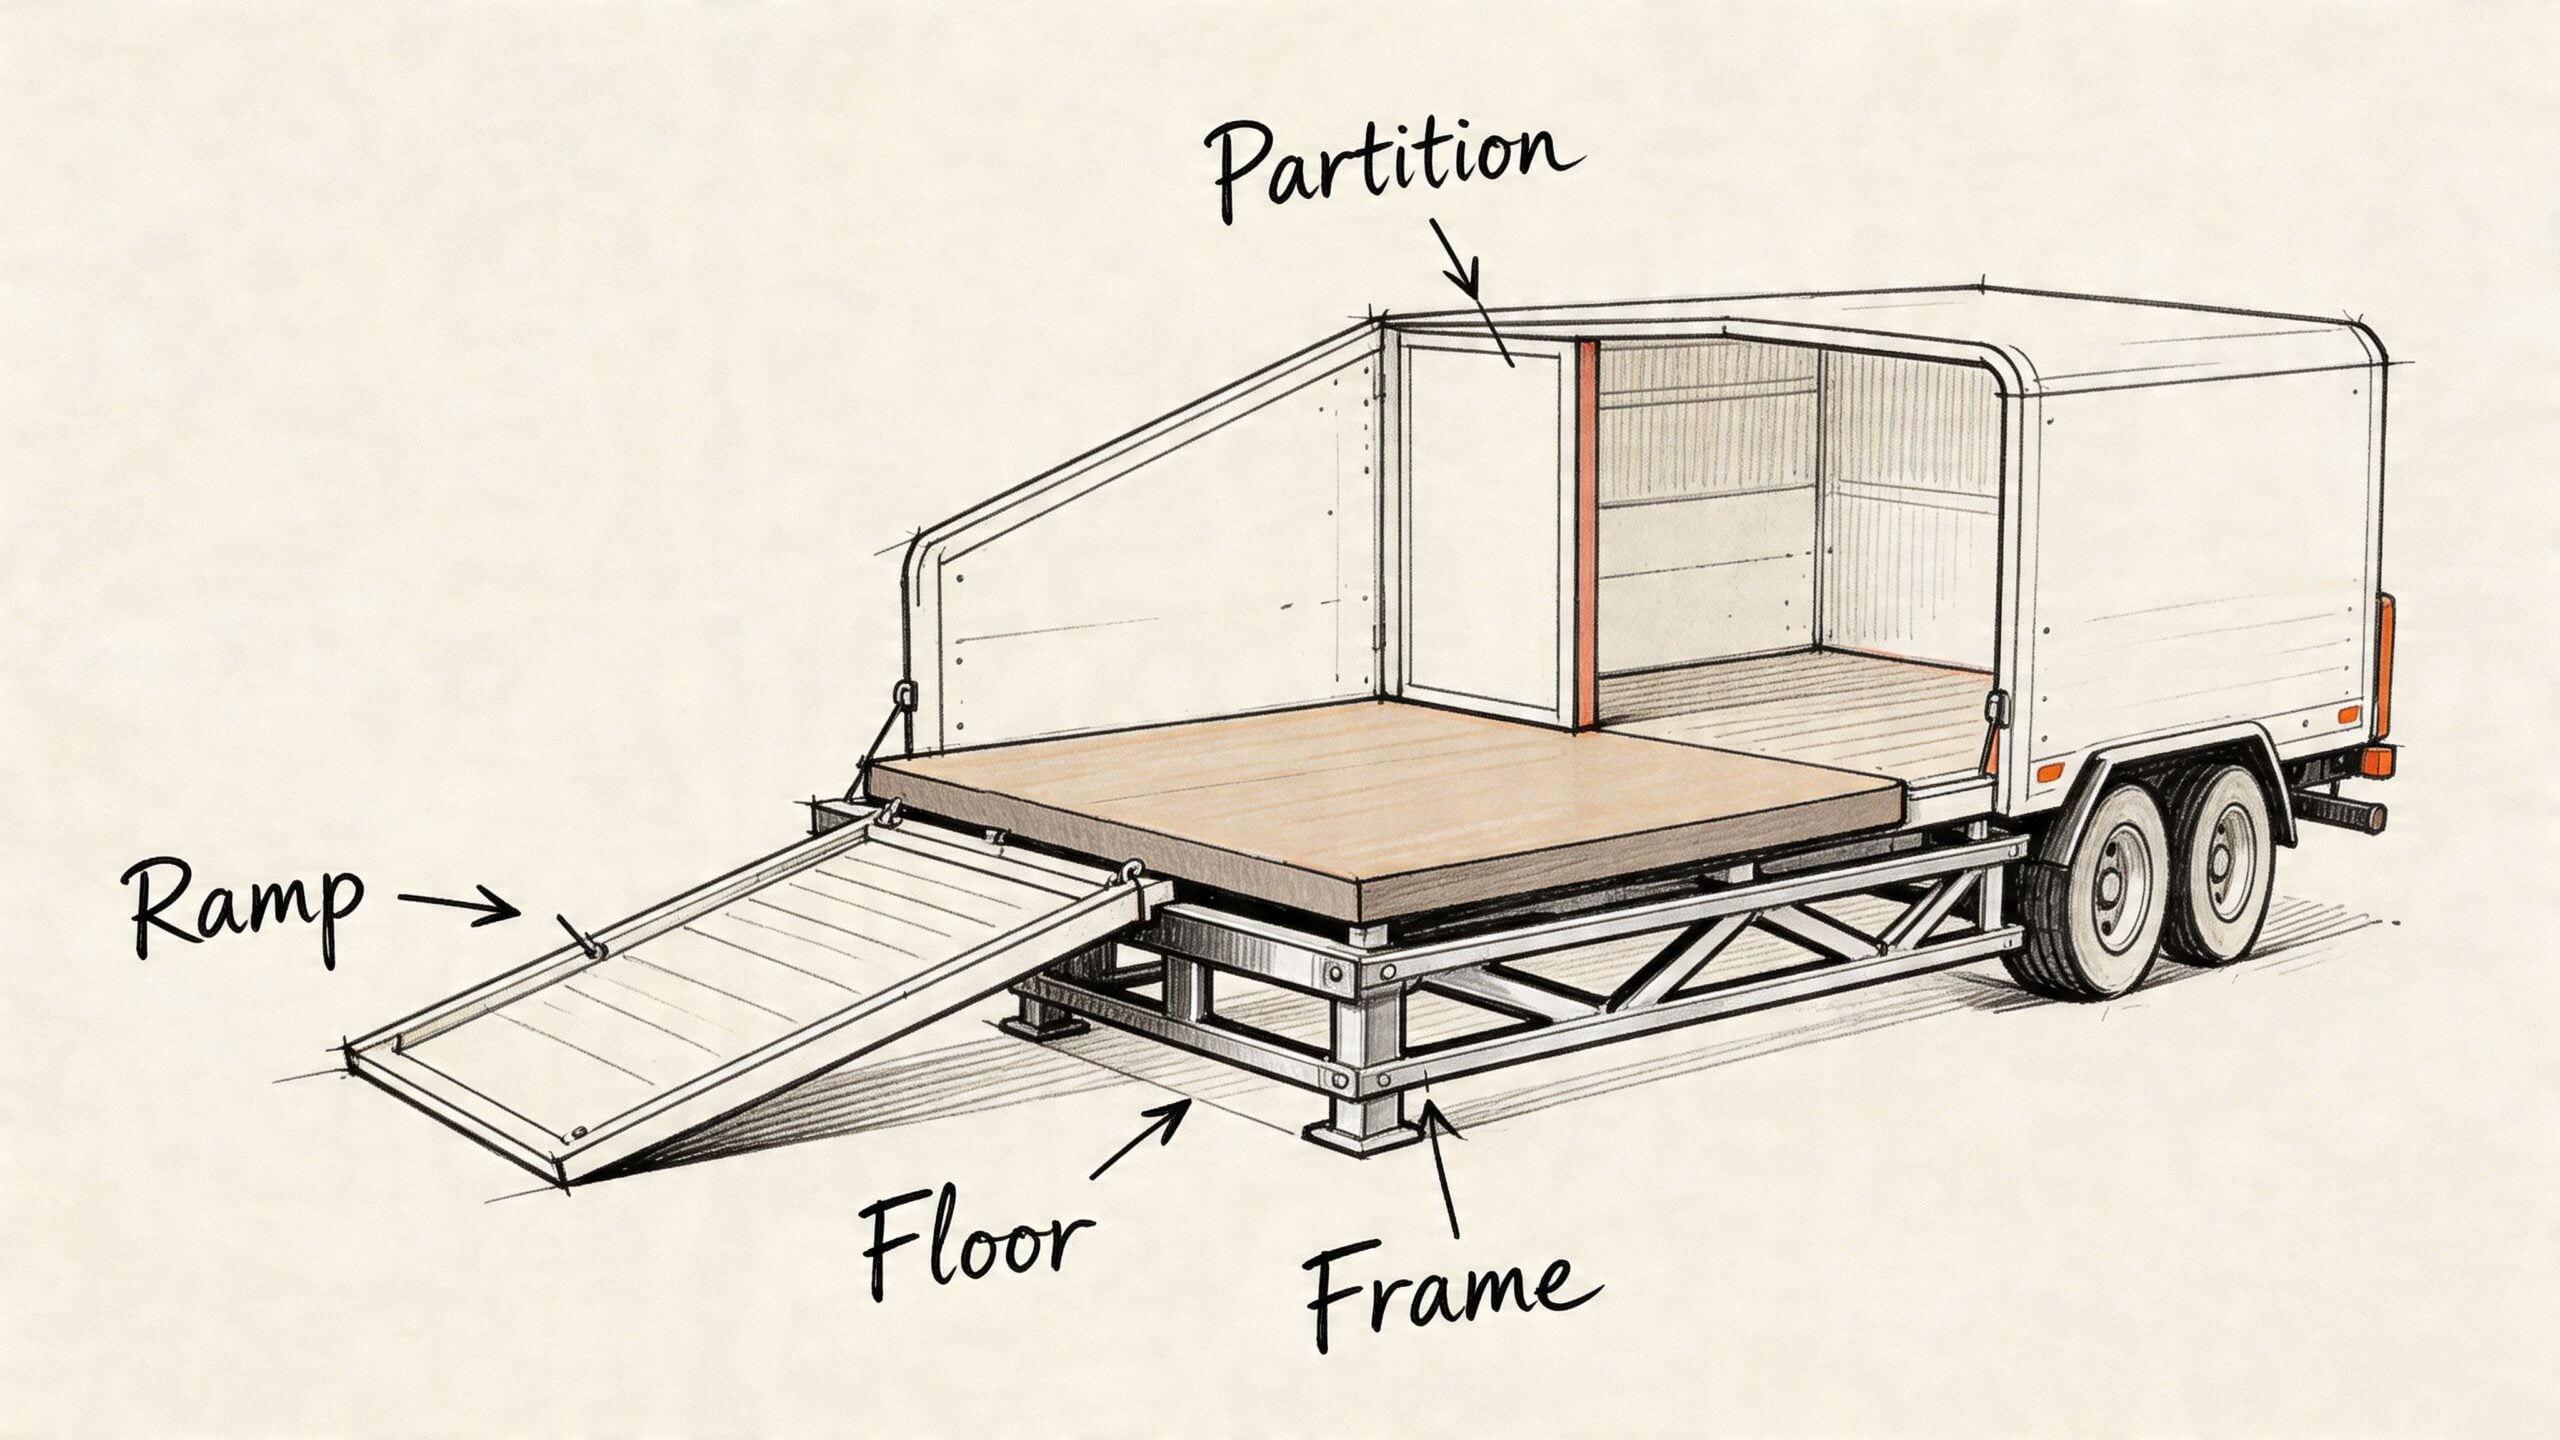
Inspecting the Body Frame and Interior Components
A horse can forgive a lot less than an owner can. A noisy ramp, a soft floor patch, a sharp edge behind padding, or stale air in warm weather all change how the trailer feels inside. Structural and interior horse trailer parts are the difference between a trailer that merely contains the horse and one that transports it safely.
According to horse trailer materials guidance covering welfare and structural considerations, DEFRA welfare standards mandate specific interior dimensions, insulated walls can cut heat transfer by 40%, and frame flex is a factor in 18% of trailer accidents. Those points matter because bodywork isn’t just about cosmetics. It affects heat, balance, durability, and how the horse braces in motion.
Start underneath and work upwards
The best body inspection starts low. Owners often look at panels first because they’re visible, but the more important evidence sits underneath.
Check these areas in order:
- Chassis rails and cross-members: Look for rust, scaling, repairs, fresh underseal hiding old corrosion, or distortion around mounting points.
- Floor supports: A solid top surface means little if the support beneath has weakened.
- Ramp frame and hinge line: Watch for cracking, sagging, swelling in timber-backed sections, or a change in how the ramp closes.
- Mounting points: Partitions, breast bars, catches, and hinges rely on the structure around them being sound.
A strong steel chassis has real advantages on rough UK roads. It resists flex and abuse well, though it still needs regular corrosion management. Aluminium saves weight and resists corrosion differently, but dents, fixings, and hidden stress points still need careful inspection. Material choice doesn’t remove the need for maintenance. It just changes what failure looks like.
Interior parts affect welfare more than owners realise
Inside the trailer, comfort and control work together. Horses travel best when footing is secure, the partition arrangement suits their size and balance, and ventilation keeps the space fresh without creating harsh draughts.
Look closely at the following:
- Flooring and mats: Lift mats fully, not just at the corners. Check for trapped moisture, corrosion, rot, or delamination.
- Partitions and pins: They should move freely, lock positively, and release without wrestling.
- Padding and coverings: Torn covers can hide damaged backing or exposed fasteners.
- Windows, vents, and roof openings: They should open, close, and seal properly.
Poor airflow and poor footing often show up first as behaviour. If a horse starts travelling badly in a trailer it previously accepted, inspect the interior before blaming temperament.
Interior condition also affects loading. A horse that hesitates at the ramp or rushes backwards may be reacting to movement, noise, poor traction, or a stale environment. Those are trailer issues until proven otherwise.
What works and what doesn’t
Some upgrades are worthwhile. Better ramp surfacing, sound mat replacement, improved ventilation hardware, and properly fitted padding all make practical sense. Cosmetic panel work that ignores structural corrosion doesn’t.
That distinction matters in restoration work as well. Projects such as Fastblast Restorations examples show how much detail goes into presenting automotive and transport-related craftsmanship properly, but on a horse trailer the unseen condition still matters more than the finish.
Your Actionable Horse Trailer Maintenance Checklist
A maintenance plan only works if it’s repeatable. Most owners don’t need a complicated workshop routine. They need a disciplined check before towing, a more thorough inspection every month, and a proper annual service that doesn’t rely on memory.
Use this inspection schedule
| Component/System | Pre-Tow Check | Monthly Check | Annual Check/Service |
|---|---|---|---|
| Hitch and coupling | Confirm secure coupling, lock engaged, breakaway cable attached correctly | Inspect wear, looseness, corrosion, and smooth operation | Service or replace worn parts as needed |
| Jockey wheel and steadies | Raise fully and secure | Check clamp security and wheel condition | Strip, clean, lubricate, assess for replacement |
| Lights and wiring | Test all road lights with a helper | Inspect plug, cable, connectors, and lamp housings | Full electrical inspection and repair of damaged loom sections |
| Tyres and wheels | Check inflation visually and inspect for damage | Inspect tread wear shape, sidewalls, valves, wheel nuts, and rim condition | Replace aged or damaged tyres, inspect bearings and wheel fitment |
| Brakes and hubs | Listen and feel for anything unusual on a short test move | Check for heat, noise, imbalance, and signs of drag | Brake service, bearing inspection, professional testing |
| Floor and ramp | Walk the ramp and glance for obvious movement or damage | Lift mats, inspect hinges, edges, latch operation, and floor condition | Deep inspection of floor structure and ramp assembly |
| Partitions and fittings | Confirm they latch and release correctly | Inspect pins, bars, padding, and tie points | Replace worn fittings and repair damaged mountings |
| Roof, vents, and seals | Check vents are set correctly for the trip | Inspect leaks, seal condition, and hardware movement | Reseal or replace failed components |
The five-minute pre-tow routine
Before every trip, do the same short sequence in the same order.
- Start at the hitch: Make sure the coupling is seated correctly, the safety connection is fitted properly, and the jockey wheel is fully raised and secured.
- Walk the lights: Use a helper if possible. Check indicators, brake lights, tail lights, and number plate lighting.
- Look at each tyre: You’re checking for obvious deflation, cuts, cracks, or a tyre that appears to be carrying the trailer differently from the others.
- Open and close the ramp: Feel for changes. Stiffness, dropping, or a new clunk matters.
- Step inside: Check partition security, footing, ventilation settings, and anything that could rattle or swing in transit.
The monthly half-hour inspection
Through this process, you catch the faults that a quick walk-round won’t show.
- Lift the mats fully. Don’t just peek. Flooring problems hide where moisture sits.
- Check all moving hardware. Hinges, catches, partition pins, and locks should move cleanly.
- Inspect underneath. Use a torch. Look for corrosion, loose fasteners, fluid contamination, rubbing cables, and worn mounting points.
- Test wheel and hub condition after a short tow. A hotter corner is telling you something.
- Clean before judging condition. Dirt hides cracks, perished seals, and water ingress.
For owners who maintain more than one trailer or work across agricultural kit as well, broad essential trailer maintenance tips can still be useful because the habits carry over. Cleanliness, lubrication, corrosion control, and routine inspection matter across all trailer types.
The annual deep-dive
An annual service is where you stop relying on visual checks alone. Book a proper brake inspection, bearing assessment, electrical test, and structural review. If the trailer is older, used heavily, or sits outside year-round, don’t postpone this because “it towed fine last season”.
Annual servicing is where hidden wear gets found before it becomes a roadside problem.
Keep records. Write down tyre changes, brake work, flooring repairs, and any recurring fault. Patterns matter. If the same corner keeps wearing tyres or the same light keeps failing, the repeated symptom usually points to a deeper issue.
How to Source Compliant Horse Trailer Parts in the UK
Buying horse trailer parts in the UK is rarely as simple as typing the trailer model into a search box and ordering the cheapest match. Older trailers, model changes, imported components, and inconsistent descriptions make wrong-part purchases common. That wastes time at best and creates a safety issue at worst.
That problem is widespread. A 2025 British Horse Society survey found 68% of UK owners struggle with part compatibility for older trailers, with the challenge worsened by post-Brexit tariffs and weak guidance on compliant replacements, according to this overview of horse trailer accessory and sourcing issues.
Buy by specification first and listing second
The safest way to source parts is to identify the part from the trailer itself before browsing suppliers. That usually means checking the VIN plate, axle plate, existing component markings, dimensions, fixing pattern, connector type, and load-related information. If a seller can’t confirm compatibility beyond “should fit most trailers”, walk away.
Use this purchasing order:
- Match the exact application: Trailer make, model, year range, and any prior modifications.
- Confirm the technical details: Ratings, sizes, fixings, handedness, wiring type, and mounting points.
- Ask about compliance: Especially for braking, lighting, coupling, and structural parts.
- Check returns before buying: Some parts can’t be returned once fitted or marked.
Main dealers can be expensive, but they’re often the cleanest route for model-specific items such as partitions, trim pieces, windows, catches, and branded fittings. Agricultural suppliers and specialist trailer factors can be stronger on generic consumables like lamps, hubs, bearings, tyres, and hardware. Online marketplaces are useful only when you already know exactly what you’re buying.
OEM versus aftermarket
There isn’t one right answer here. Some aftermarket parts are perfectly suitable. Some are poor. The issue isn’t the label. It’s whether the part is properly specified, made consistently, and suitable for the actual job.
A useful way to think about it is this:
| Buying route | Usually works well for | Main risk |
|---|---|---|
| Dealer-supplied parts | Model-specific fit and trim items | Higher cost |
| Specialist trailer factors | Wear parts and standardised components | Misidentification if details are incomplete |
| General online sellers | Minor accessories if specification is known | Inconsistent quality and weak support |
| Used parts sellers | Hard-to-find non-critical trim items | Unknown wear, hidden damage, no traceability |
If you want a broader sense of what careful production control looks like, this article on quality manufacturing processes is useful background reading. It isn’t horse-trailer specific, but it explains why consistency, inspection, and process control matter when you’re trusting a part to perform under load.
Where owners go wrong
The most common mistake is buying on appearance. A lamp, latch, hub, or brake component may look right and still be wrong in a way that only becomes obvious during fitting or use. The second mistake is treating every part as equal. A cosmetic vent trim is not the same risk category as a coupling head, brake assembly, or floor support component.
If you’re documenting parts lists, fitment notes, or product pages for a workshop or transport business, one option for presenting that information clearly online is Vision Autoworks project work, which shows how automotive-related services can be organised in a way customers can readily use.
DIY Repair vs Calling a Professional When to Make the Call
Some trailer jobs are sensible DIY tasks. Others aren’t worth the risk unless you’ve got the right tools, experience, and a safe working setup. The difficult part is that owners often judge the job by how small the part looks, not by what happens if it fails.
Modern trailer systems haven’t stayed simple. As noted in industry background on modern horse trailer systems, integrated electric brakes and more complex suspension arrangements have moved well beyond the simpler setups many owners think they’re dealing with, and safe installation often requires specialised diagnostic tools and knowledge.
Jobs most owners can handle
If you’re practical and methodical, there are plenty of maintenance tasks that sit comfortably within owner-level capability.
- Bulb and lamp unit replacement: Straightforward if the fault is clearly local and the wiring isn’t damaged.
- Cleaning and lubrication: Hinges, catches, locks, jockey wheel threads, and accessible moving hardware all benefit from regular attention.
- Mat lifting and floor inspection: Time-consuming, but important and well within reach for most owners.
- Basic trim and padding replacement: Fine if you aren’t altering structural mountings.
These jobs still require care. Isolate electrical circuits where appropriate, support moving parts properly, and never rush because you’re loading up later the same day.
Jobs that usually need a workshop
Brake work, bearing issues, axle replacement, suspension diagnosis, floor structure repairs, and anything involving coupling geometry or load-bearing welds generally belong with a professional. The same applies if the trailer has developed a towing fault you can feel but not clearly identify.
Use three questions to decide:
- What happens if I get this wrong?
- Can I test the repair properly before carrying a horse?
- Do I have the tools to work safely, not just somehow complete the task?
If the answer to any of those is uncomfortable, book it in.
A successful DIY repair isn’t the one that bolts on. It’s the one you can trust at road speed with a live load.
A practical rule of thumb
DIY is reasonable for visible, low-consequence items with clear fitment and clear testing. Professional help makes sense for hidden systems, anything load-bearing, and anything tied to braking, wheel retention, structural integrity, or legal compliance.
There’s also a middle ground that works well. Diagnose and strip where safe, photograph everything, gather part numbers, and then hand over to a trailer specialist for the critical work. That can save time and help you understand your own trailer better without turning a safety system into an experiment.
Frequently Asked Questions About Horse Trailer Parts
Is it legal to use second-hand parts on my trailer
Sometimes, but legality isn’t the only test. A used trim panel, window catch, or internal fitting may be fine if it’s in sound condition and compatible. I’d be very cautious with used horse trailer parts that affect braking, coupling, wheel retention, structural load, or containment. Even where a used part might be lawful, it may still be the wrong decision if you can’t verify wear, origin, or specification.
How do I know if a part is compliant in the UK
Start with the trailer’s own identification details and the exact application of the part. Ask the supplier to confirm compatibility and suitability for UK road use. Keep invoices, product descriptions, and any technical confirmation you receive. If a supplier can’t explain what the part fits, what standard it meets, or why it’s suitable, treat that as a warning.
Does insurance cover failure of a part I fitted myself
That depends on the policy and the circumstances. Insurers may look closely at whether the part was suitable, whether it was fitted correctly, and whether poor maintenance contributed to the incident. If you fit a part yourself, keep records, photographs, and purchase details. For safety-critical items, a professional invoice is often worth having.
What are the rules for breakaway cables
The cable must be attached correctly every time you tow, and it must be compatible with the hitch arrangement on your trailer and towing vehicle. It isn’t there as a loose backup or something to loop carelessly because it’s convenient. If you’re unsure about routing or attachment, ask a qualified trailer technician to show you the correct setup for your combination.
Can I mix brands when replacing parts
Yes, in some cases, but only if the replacement part is compatible and suitable for the system it’s joining. Mixed components become risky when owners assume that “close enough” is acceptable for brakes, hubs, couplings, suspension parts, or electrical connectors. Matching specification matters more than matching appearance.
What documents should I keep after replacing parts
Keep a simple file with receipts, part numbers, dates, photos before and after, and any workshop notes. If the trailer develops a repeat fault later, that record helps you or your technician avoid starting from scratch. It also helps if you sell the trailer and want to show a clear maintenance history.
If your business needs this kind of technical subject turned into clear, usable website content, DesignStack builds and supports websites, branding, and digital content systems that help UK firms present specialist services in a way customers can trust.


Leave a Reply